Today I am teaching
you very interesting thing is that of about outlook.in this tutorials we shall
learn about POP and IMAP, and how to configure outlook in MS outlook 2013.You
should to know about this.
Let’s join
this tutorials without any delay.
Difference
between POP and IMAP.
Of the two, IMAP is the better option - and the
recommended option - when you need to check your emails from multiple devices,
such as a work laptop, a home computer, or a tablet, smartphone, or other
mobile device. Tap into your synced (updated) account from any device with
IMAP.
POP3
downloads email from a server to a single computer, then deletes it from the
server. Because your messages get downloaded to a single computer or device and
then deleted from the server, it can appear that mail is missing or disappearing
from your Inbox if you try to check your mail from a different computer.
|
POP3 - Post Office Protocol
|
IMAP - Internet Messaging
Access Protocol
|
|
You can use only one computer
to check your email (no other devices)
|
You can use multiple computers
and devices to check your email
|
|
Your mails are stored on the
computer that you use
|
Your mails are stored on the
server
|
|
Sent mail is stored locally on
your PC, not on a mail server
|
Sent mail stays on the server
so you can see it from any device
|
If you want to go with POP, then here is setting for pop.
Here's how to enable POP in Gmail:
1. Sign in to Gmail.
2. Click the gear in the top right (setting).
3. Select Settings.
4. Click Forwarding and POP/IMAP.
5. Select Enable POP for all mail or Enable
POP for mail that arrives from now on.
6. Choose what to do with your messages after
your POP client or device receives them.
7. Click Save Changes.
Although the radio button next to your selected option may not
stay selected, Gmail displays the status next to 'POP Status:.' When you enable
POP, your settings display 'POP Status: POP is enabled.'
If your POP settings are turned off, the status will indicate
that POP is disabled.
If you want to go with imap here is setting for IMAP
Enable IMAP in your Gmail settings
1. Sign in to Gmail.
2. Click the gear in the top right .
3. Select Settings.
4. Click Forwarding and POP/IMAP.
5. Select Enable IMAP.
6. Click Save Changes.
Note: This setting is not available while
using the basic HTML view of Gmail. To enable IMAP, use the standard view
instead. Find out more about standard view and basic HTML view.
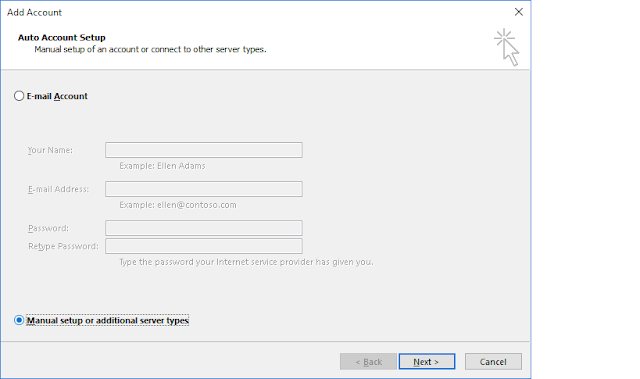
1 Then open outlook.
Click on manual setup or additional server types.

3.
Click on POP or IMAP.
4.
Fill the all required option.(as shown in the fig.). Then Click on more setting..
For ex.
User information
Your name=sanjay kaqnojiya
Email address=sanjaykanojiya339@gmail.com
Server information
Account type=pop (you can select anyone either POP or IMAP)
Incoming mail server=pop.gmail.com
Outgoing mail server=smtp.gmail.com
Logon information
Username=sanjaykanojiya339
Password=in that you type your email password.
Choose outgoing server.
3. .
4.
Click on advance tab.
Use the following type of encrypted connection. (Choose SSL from the list SMTP=465).
Then click OK
And click next.
Following screen are appear on the screen.
If all the task completed it means you have
successfully configure the outlook 2013.
If you did not receive all the mail then
click on send\receive in the outlook
2013 homepage.
By this you can receive all mails.
Thank you for join this tutorials.


No comments:
Post a Comment